When there is fresh pasta being rolled in my kitchen, I’m truthfully usually nowhere to be seen. Pasta is my husband’s specialty — he just has an instinct and the patience for it that I lack. But I’m getting a little better at it… slowly! There are things that a cookbook (or a website) can’t teach you about making fresh pasta: how to add the flour bit by bit so that the dough comes together smoothly, how to decide if the dough is too sticky or too dry to be rolled, how many times to run it through the rollers to get a nice even sheet. These are the growing pains of pasta-making.


We usually make pasta at Thanksgiving as a starter course — a nod to my husband’s Italian family who would rather eat cavatelli than turkey on the big day. This year’s pasta course consisted of these pillowy pear and ricotta ravioli, which we then smothered in brown butter. Our guests were not hating it!


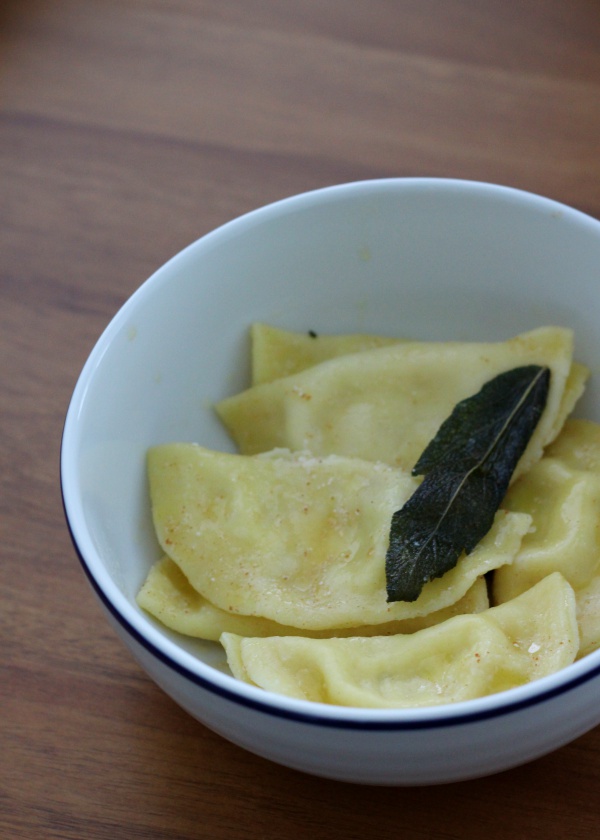
Pear Ricotta Ravioli with Brown Butter and Sage
Makes about 65 ravioli
Ingredients
Pasta dough:
4 eggs
400 g semolina flour
1 tsp salt
1 tsp olive oil
Filling & Assembly:
2 Bartlett pears, peeled and diced into 1/4 inch cubes
4 Tbsp. unsalted butter
1 c. whole milk ricotta cheese
1/2 c. mascarpone cheese
1/2 c. pecorino Romano cheese, grated
1/2 c. Parmesan cheese, grated
1/4 tsp. cinnamon
1/4 tsp. nutmeg
1 egg, beaten
Butter sauce:
2 sticks good-quality salted butter
10-15 sage leaves
Instructions
Make the Dough
Attach the dough hook to a KitchenAid mixer. In the bowl of the mixer, beat together the eggs with a fork to break them up. Attach the bowl to the mixer and add in 2/3 of the flour.
Mix with the dough hook on medium-low speed until the dough begins to come together, about 2-3 minutes. Add the salt and the olive oil and the rest of the flour. Mix again on medium-low speed until the dough is elastic but not sticky, for another 5-7 minutes. You may need to stop the mixer to pull the dough down off of the hook a few times throughout the process.
The dough will be drier than you think it should be — don’t be afraid to add a little bit of additional flour if it still seems sticky. Sticky dough will get into your pasta rollers and be a pain to get out! If the dough happens to get TOO dry (i.e. cracking, won’t stay together), massage a drizzle of cold water into it and mix further.
Gather the dough into a ball, cover with plastic wrap and set in the refrigerator for 30-60 minutes to rest.
Make the Filling
While the dough rests, melt the 4 Tbsp. of unsalted butter in a large skillet over medium-high heat. Add the diced pear and sautée until slightly soft, about 5 minutes. Let cool to room temperature.
In a large mixing bowl, combine ricotta cheese, mascarpone, pecorino Romano, parmesan, cinnamon, nutmeg and the cooled pears. Mix to combine.
Assemble the Ravioli
Have your beaten egg nearby with a pastry brush (you’ll use it to seal the ravioli).
Remove the pasta dough from the refrigerator and prepare a flat pasta roller. We use a KitchenAid mixer attachment, but you could also use a hand-operated or freestanding electric roller. Cut a roughly 1-inch by 4-inch slice of the dough from the ball. Be sure to keep the rest of the dough tightly covered in plastic wrap while you are not using it to keep it from drying out.
Starting on the thickest roller setting on your pasta roller (usually “1”), flatten the dough and run it through the roller 2-3 times, folding the edges in to work the dough toward a rectangular shape each time. When the shape is even, click your roller down to the next thinnest setting and roll once. Work your way down until you have a long, thin sheet of pasta (we like the “5” setting on the KitchenAid roller).
Using a round cookie or biscuit cutter (ours is about 2-inches in diameter), stamp out rounds of dough. You can re-roll the scraps later. Use a scant 1 Tbsp. of filling in the center of each circle. Lightly brush egg around the edge of one half of a circle, pull the other half over the filling, and press the edges together to seal. Try to seal all the way down to the filling so that there is not an air pocket in the center of the ravioli. Transfer finished ravioli to a baking sheet lined with parchment. Repeat until you run out of filling!
Cook or Freeze
Bring a large pot of salted water to a boil.
Meanwhile, in a large skillet, melt the stick of butter over medium heat. Swirling the pan constantly (and keeping a close eye on the butter!), cook until the foam settles and add the sage leaves. Continue to cook until the butter takes on a golden, nutty color and smells slightly nutty. Pull the butter immediately from the heat at this point — you don’t want it to go too far and burn!
Add the ravioli to the boiling salted water and cook until al dente, about 4-5 minutes. Use a slotted spoon to transfer the ravioli straight from the water into the butter. Toss to coat and plate the ravioli with a few of the butter-frizzled sage leaves!
Notes
If you don’t plan to eat the ravioli within a few days (3 at most), pop the baking sheets with the uncooked ravioli on them into the freezer for 2 hours. When they are mostly frozen, transfer them to a large airtight bag and store in the freezer for up to a month. Cook as directed above, though you may need to add a minute or two to the amount of time the ravioli spend in the water if they come straight out of the freezer.
I’ve never thought to include pear as a ravioli combination. Now I must try this!!!