I’m all about honesty, so let’s just make one thing totally clear about this recipe: I was really just looking for a vehicle that would make it acceptable for me to eat an absurd amount of vanilla pastry cream when I came up with this recipe. The fact that plums are in season and that they happen to taste really fantastic when they get all roasty was just an added bonus to filling a tart crust with an absurd amount of pastry cream.
During the summer, I made Smitten Kitchen’s Nectarine Gingersnap Tart at least 4 times for various occasions, and I loved the combo of the creamy cheesecake-like filling with juicy, ripe stone fruit. I started thinking about how the recipe could transform for the fall, and that’s when the pastry cream started calling my name.
Roasting the plums is a good idea for a number of reasons — it will give them a softer texture, plus it helps to concentrate the natural sugars in the fruit, which is awesome if you’re already using a juicy, ripe plum or a lifesaver if your plums happen to be slightly underripe.

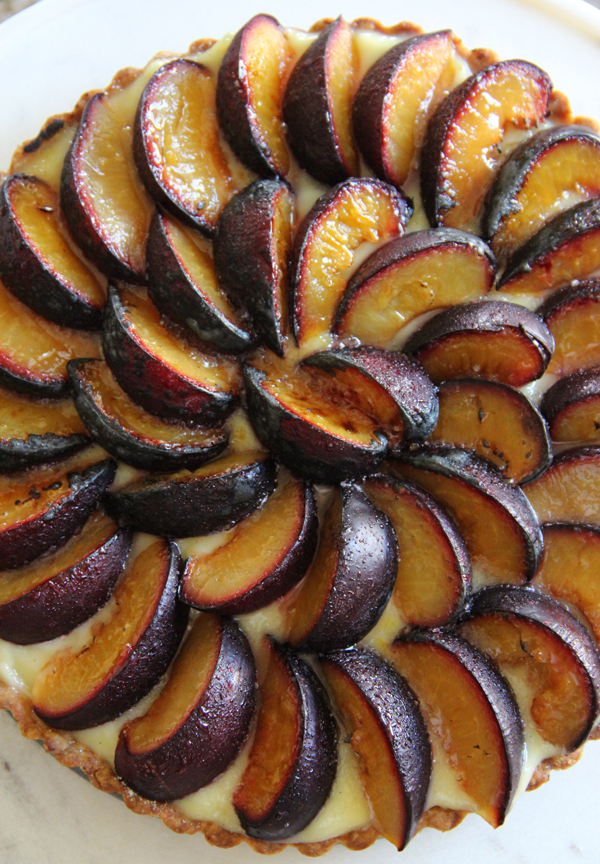
I finished the top of this tart off with a brûléed sugar coating to give it a slightly crunchy finish and to emphasize that roasted flavor. That step is totally optional, but highly recommended if you have a kitchen torch handy.
Roasted Plum Tart
Ingredients
Tart Crust
1 1/4 c. all-purpose flour (plus additional for rolling)
1/2 tsp. salt
2 Tbsp. granulated sugar
10 Tbsp. frozen unsalted butter, cut into small cubes
1 egg yolk
2-3 Tbsp. ice water
Vanilla Pastry Cream
3/4 c. heavy cream
3/4 c. whole milk
1 vanilla bean
4 egg yolks
1/2 c. sugar
2 Tbsp. cornstarch
1 tsp. vanilla extract
3 Tbsp. unsalted butter, at room temp
Plum Topping
4-5 ripe plums
1/4 c. granulated sugar (optional)
Instructions
Make the crust
In the bowl of a food processor, combine the flour, salt and sugar.
Scatter the butter cubes throughout the flour mixture and quickly pulse the food processor 3-4 times until course crumbs form.
Add the egg yolk and run the processor until well-distributed.
Add the ice water a bit at a time and process just until the dough comes together but is not sticky.
Press dough into a disc and wrap tightly in plastic wrap. Refrigerate for at least one hour.
— You can also make the tart dough without a food processor by using a pastry cutter or two forks to cut the butter into the flour mixture, then quickly knead the egg and water into the dough. —
Pre-heat the oven to 400 degrees Fahrenheit. Let dough sit at room temperature for 10 minutes before rolling. Lightly dust your workspace with flour, then roll out the tart dough to about 1/2 inch wider than your tart pan. Transfer the round of dough into a tart pan with removable bottom and press it into the bottom and up the sides of the pan. Trim the excess at the top of the pan and use the scraps to patch any thin spots or holes. If the dough has become very soft, pop the tart into the freezer to firm it back up before baking.
Prick the bottom of the tart with a fork to vent. Line the bottom of the tart with parchment paper and then pour in pie weights to cover (I like to use dried beans. I reuse them over and over again!). Bake the tart for 8 minutes. Remove from the oven and remove the parchment and weights.
Reduce the oven to 350 and bake the tart until golden, about 12-15 minutes more. Remove to a wire rack to cool.
Make the pastry cream
Add the cream and milk into a medium saucepan. Split the vanilla bean down the middle and scrape the seeds into the cream. Drop the vanilla pod in with the cream.
In a medium mixing bowl, whisk the egg yolks to break them up. Add the sugar and whisk so that the yolks lighten. Add the cornstarch and whisk until the mixture is pale yellow and lump-free.
Heat the cream mixture on the stovetop over medium heat until it just starts to simmer at the edges (do not let it boil!). Turn off the heat and pull out the vanilla pod.
Working quickly so that your eggs don’t scramble, carefully pour about 1/4 c. of the warm cream into the egg yolk mixture while whisking vigorously to temper the eggs. Once well combined, pour in another 1/2 c. or so of the cream and whisk. Pour everything from the mixing bowl back into the saucepan and whisk to combine. Return the saucepan to the stovetop.
Cook the mixture over medium heat, whisking the entire time. Cook until the mixture begins to rapidly thicken and bubble. Let bubble for 20 seconds, then turn off the heat. Add the vanilla extract and butter, whisk until smooth. Let cool to room temp and then spread the filling into your cooled tart shell. Cover with plastic wrap and refrigerate until cold.
Roast the plums
Pre-heat the oven to 400 degrees. Line a large baking sheet with parchment paper.
Cut the plums in half and remove the pits. Cut each plum into about 10-12 wedges. You don’t want them to be paper thin, but you don’t want them to be too thick either.
Arrange the plum wedges on the baking sheet (no need to leave a lot of room between them) and roast for 15 minutes. Use tongs to flip the wedges to the other side and roast another 10 minutes until the plums are soft.
Assembly
Arrange the cooled plum wedges in a spiral patten on the top of your tart. I like to start on the outside and work my way in.
(optional) Sprinkle the top of the tart with the granulated sugar and use a kitchen torch to brûlée the sugar, forming a crust on top of the plums. Cut into slices and enjoy!
Notes
Add any additional notes here.
Comments